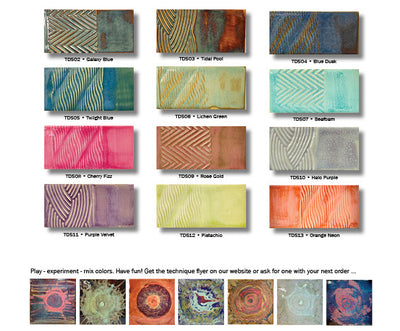
Threadship Embroidery Threads come in a huge array of colors and types in high quality low-cost bulk packs! Great for thread painting, embroidery, embellishments on quilts and clothes, or any stitch craft.
Threadship Tie-Dye Thread Is:
- Great for thread painting projects, stitch work, quilt or textile embellisments, friendship bracelets or any craft!
- Made with 100% mercerized cotton in the United States
- 36 Skeins per pack, 8.7 yards per skein
- 6-stranded threads are easily divisible to create desired thread weight
- 18 skeins of bright colors & 18 multicolored
QUICK START TUTORIAL TO EMBROIDERY ⤵️
Get the basics! Learn to embroider and create beautiful unique pieces – Warning! Your friends will be extremely proud of your creative crafty abilities!
WHAT YOU'LL NEED IN YOUR TOOL KIT:
WHAT YOU'LL NEED IN YOUR TOOL KIT:
- DMC Prism Threads
- Design of your choice
- Fabric or item you are going to embroider onto
- Embroidery Needle
- Embroidery Scissors
- Tracing Paper, Water Soluble Pen, Chalk Pencil, Or Carbon Transfer Paper
- Embroidery Hoop
PREPARE YOUR PROJECT:
Separate your Thread – DMC Stranded Threads are composed of six strands that are twisted together and easy to separate. Many embroidery designs call for different strands of thread, so you may need to separate your thread. Refer to your design chart to see how many strands (or plies) of thread the design specifies.

Find the end of the thread on your skein of DMC Thread. Slowly pull the end out from the skein until you have an 50cm (18”) length of thread and cut it off. To separate the thread into individual strands, pull one strand up and out slowly until it is completely separated from the remaining strands. Continue to pull out the number of strands you need to stitch with. To rejoin the threads, hold them together at one end then gently pass your hand over the lengths to smooth and recombine them.
Prepare Fabric - Place your fabric into an embroidery hoop. Click here for directions on how to use an embroidery hoop.
Transferring a Design to your fabric - The technique to transfer a design onto fabric depends on the color and thickness or weight of the fabric. You can use Embroidery Tracing Paper to make it easy to trace your design onto your fabric. Click here to see other methods of transferring an embroidery design to your fabric.
To use Carbon or Transfer Paper - Place your fabric on a hard smooth surface and tape it down to secure. Position the tracing paper over the fabric with the coloured side down. Place the design over the transfer paper and tape it into place. Carefully trace the design with a stylus or an empty fine point ball tip pen. To achieve the best results, take your time and use a long continuous line with even pressure rather than a sketching motion. Use the dark coloured paper for light coloured fabrics and the light coloured paper for darker fabrics.
Thread your needle – Follow this handy needle threading guide to thread your needle with a Needle Threader.

START STITCHING:
DMC Quick Embroidery Stitch Tips:
- Perfectly Spaced Stitches – to achieve uniform stitch size when embroidering a line or band, use a ruler or tape measure to mark tiny evenly spaced dots along the stitching line with a water soluble marker. You will learn to gauge stitch distances with experience.
- Stab “Up and Down” – when working with your fabric in a hoop it is preferable to stab the needle vertically up and down through the fabric to achieve well-formed and even stitches.
- Keep your Tension Even- to create smooth uniform stitches, pull each stitch with the same amount of tension. If the stitch is too loose the stitch will appear limp and if the stitch is pulled too tightly the fabric will pucker and cause the design to become distorted.
Starting:
To create beautiful “bump-free” embroidery, DMC recommends you start your stitching using one of the methods described below.
Waste Knot Method:
Use when stitching a line and no previous stitching is available to secure your thread. Knot the end of the thread and take your needle from the front to the back about 1” or so from your starting point (and on the line to be stitched). Bring the needle up to the front at the starting point. Start stitching towards the knot, being sure to cross over the thread on the back with each stitch to secure it. When your stitching reaches the knot, pull it up and snip it close to the fabric.

STOPPING
To end a thread, run your threaded needle under the last few stitches on the back of the fabric, and clip off the excess thread. After rethreading the needle to continue, simply run the needle under several stitches on the back to secure the thread and resume stitching.